
Appearance
循环链表在业务中的一次应用
一天,产品经理发来一个需求,首页改版,需要在首页上放一个轮播图,一开始还以为只用简单的调用一下 antd 就能搞定,经过产品经理一番解释(打开别的网站)才发现,不是一个简单的轮播图。

看到这张 gif,大家应该就能知道循环链表需要应用在哪了吧 😄
接下来开始从零开始实现一个轮播图。
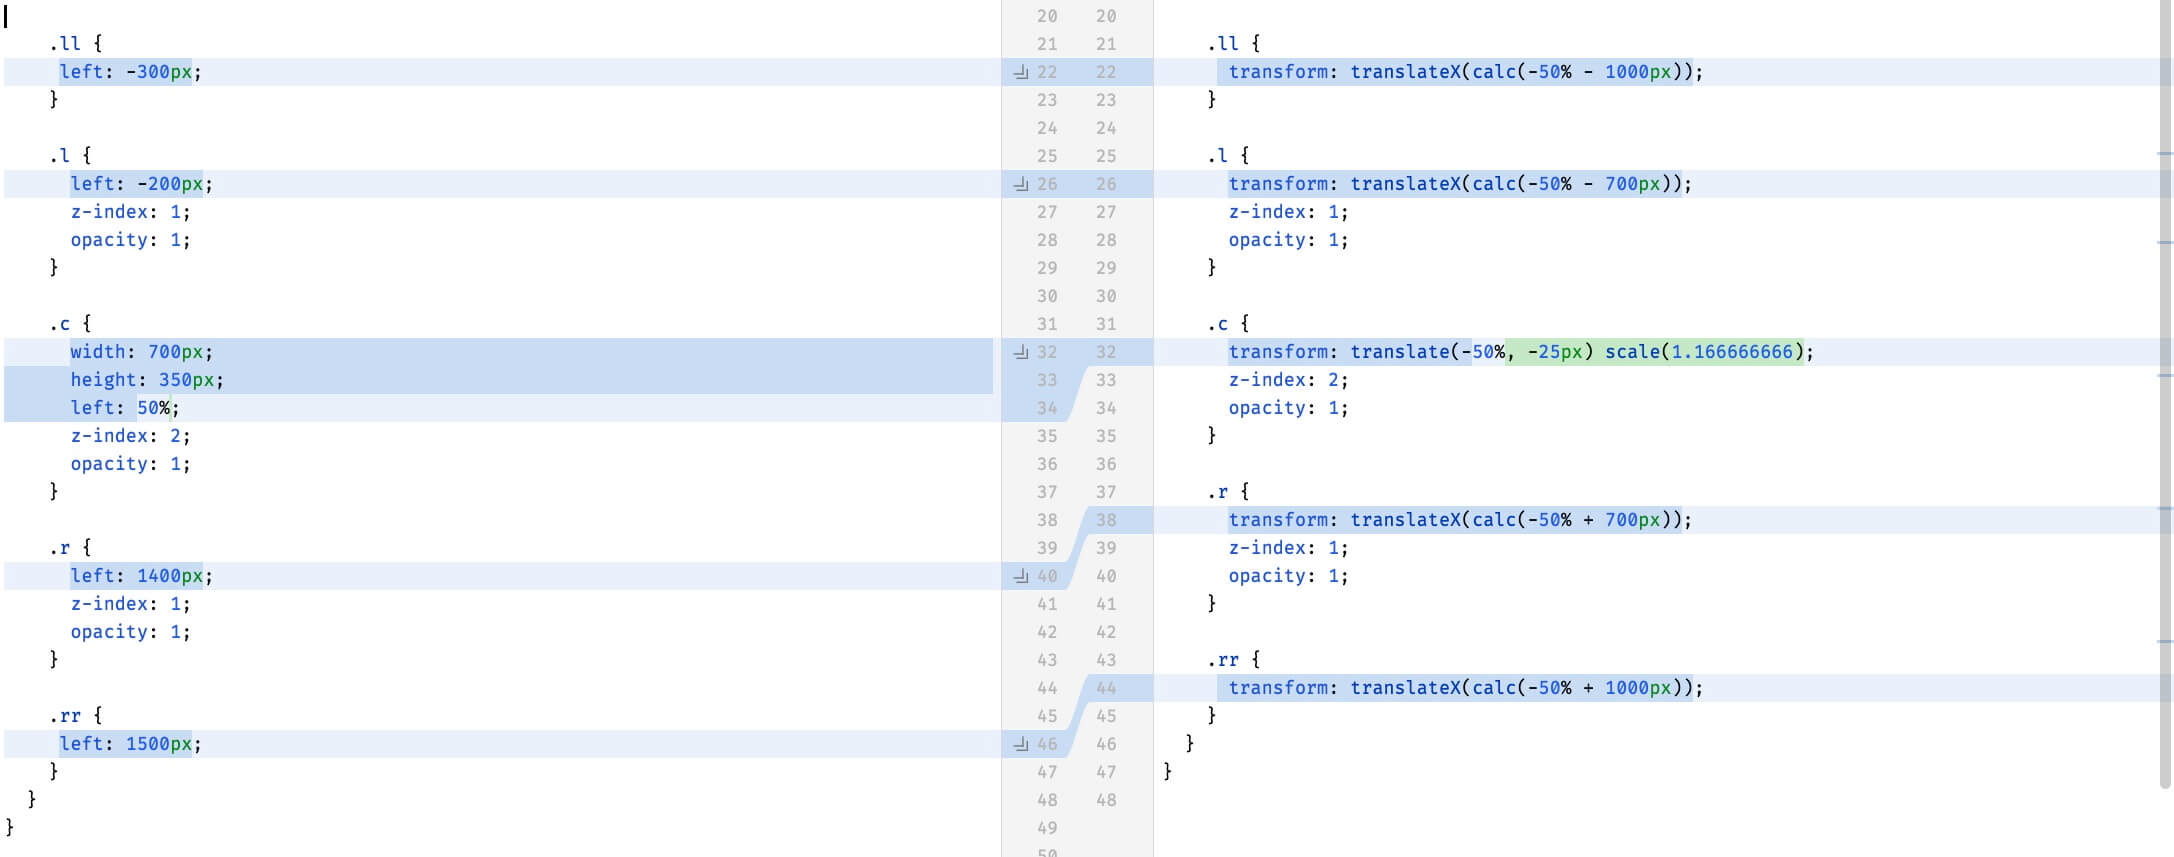
卡片静态位置
虽然最终效果上只有三张卡片能被观察到,但是左右的两张卡片需要有出入的效果,所以需要至少有五个固定的位置,五张卡片来实现动画。

html
<div className="container">
  <div className="card ll" style="background:red">1</div>
  <div className="card l" style="background:orange">2</div>
  <div className="card c" style="background:yellow">3</div>
  <div className="card r" style="background:green">4</div>
  <div className="card rr" style="background:blue">5</div>
</div>
scss
.container {
  border: 1px solid #000000;
  height: 400px;
  position: relative;
  width: 1200px;
  overflow: hidden;

  .card {
    width: 600px;
    height: 300px;
    position: absolute;
    bottom: 0;
    transition: all 0.5s;
    transform: translateX(-50%);
    left: 50%;
    opacity: 0;
    z-index: 0;
  }
  .ll {
    transform: translateX(calc(-50% - 1000px));
  }
  .l {
    transform: translateX(calc(-50% - 700px));
    z-index: 1;
    opacity: 1;
  }
  .c {
    transform: translate(-50%, -25px) scale(1.166666666);
    z-index: 2;
    opacity: 1;
  }
  .r {
    transform: translateX(calc(-50% + 700px));
    z-index: 1;
    opacity: 1;
  }
  .rr {
    transform: translateX(calc(-50% + 1000px));
  }
}
实现循环链表
首先定义出链表所需要的节点
ts
class ListNode {
  index: number
  next: ListNode
  prev: ListNode

  constructor(index: number, next: ListNode = null) {
    this.index = index
    this.next = next
    if (next) {
      next.prev = this
    }
  }
}
然后再把节点连接起来,生成最终的链表
ts
const list = new ListNode(1)
list.next = new ListNode(2, new ListNode(3, new ListNode(4, new ListNode(5, list))))
list.next.prev = list
绑定
搞定静态的卡片和循环链表后,我们就需要将卡片的位置与循环链表对应起来。
配合 React 或者 Vue 等现代前端框架,我们只需要一个函数,就能很轻松的将链表的节点与卡片进行一一对应。每次链表节点的更新,卡片的位置也能够响应式的进行变化。
jsx
function getClass(node: number) {
  let position = ''
  if (node === head.prev.prev.index) {
    position = 'll'
  }
  if (node === head.prev.index) {
    position = 'l'
  }
  if (node === head.index) {
    position = 'c'
  }
  if (node === head.next.index) {
    position = 'r'
  }
  if (node === head.next.next.index) {
    position = 'rr'
  }
  return 'card ' + position
}

return (
  <div className="container">
    <div className={getClass(1)} style={{ background: 'red' }}></div>
    <div className={getClass(2)} style={{ background: 'orange' }}></div>
    <div className={getClass(3)} style={{ background: 'yellow' }}></div>
    <div className={getClass(4)} style={{ background: 'green' }}></div>
    <div className={getClass(5)} style={{ background: 'blue' }}></div>
  </div>
)
完成
最后的结果,我们只需要将上文的样式表、循环链表、DOM 元素结合起来,一百多行代码,就能实现一个看起来效果还挺不错的轮播图啦。
tsx
class ListNode {
  index: number
  next: ListNode
  prev: ListNode

  constructor(index: number, next: ListNode = null) {
    this.index = index
    this.next = next
    if (next) {
      next.prev = this
    }
  }
}

const list = new ListNode(1)
list.next = new ListNode(2, new ListNode(3, new ListNode(4, new ListNode(5, new ListNode(6, list)))))
list.next.prev = list

export default function Swiper() {
  const [head, setHead] = useState(list)

  function getClass(node: number) {
    let position = ''
    if (node === head.prev.prev.index) {
      position = 'll'
    }
    if (node === head.prev.index) {
      position = 'l'
    }
    if (node === head.index) {
      position = 'c'
    }
    if (node === head.next.index) {
      position = 'r'
    }
    if (node === head.next.next.index) {
      position = 'rr'
    }
    return 'card ' + position
  }

  function prev() {
    setHead(head.prev)
  }

  function next() {
    setHead(head.next)
  }

  return (
    <div id="swiper-page">
      <div className="container">
        <div className={getClass(1)} style={{ background: 'red' }}></div>
        <div className={getClass(2)} style={{ background: 'orange' }}></div>
        <div className={getClass(3)} style={{ background: 'yellow' }}></div>
        <div className={getClass(4)} style={{ background: 'green' }}></div>
        <div className={getClass(5)} style={{ background: 'blue' }}></div>
        <div className={getClass(6)} style={{ background: 'purple' }}></div>
      </div>
      <button onClick={prev}>prev</button>
      <button onClick={next}>next</button>
    </div>
  )
}
接下来,就只需要根据实际的业务,替换真实的图片,添加定时器,根据 ui 调整卡片的位置,就完成了 ✌️
transform 优化
项目一开始,是通过绝对定位的 left 属性来实现卡片位置的区别的,直到看到一篇有关 css 性能优化的 文章
CSS transform 属性并不会触发当前元素或附近元素的 relayout。浏览器将当前元素视为一个整体,它会缩放、旋转、移动这一整个元素。
浏览器只需要在动画开始之时生成位图,然后将位图发送给 GPU。之后浏览器不需要做额外的 relayout 和 repaint,甚至不需要发送位图给 GPU。浏览器只需要充分发挥 GPU 的长处:绘制同一张位图到不同的位置、旋转角度和缩放比例。
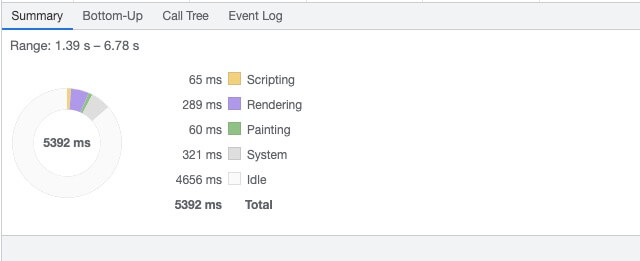
尝试了一下比较 transform 与 left,分别录制连续执行六次轮播动画,可以看到两份截图中,Rendering 的耗时有着不小的差别。由于改变了各个卡片的 class 以及背景色,还是会有 100ms 左右的回流耗时,无法避免。
![]()
白给时刻
项目上线之后,我不知是在哪里看到这样一段代码
js
arr.push(arr.shift())
arr.unshift(arr.pop())
在一瞬间将头部弹出的直接塞回尾部,尾部弹出的塞回头部,数组的这般骚操作,完美的实现了循环的功能,只需要简单的改造一下 getClass、next、prev 方法,就能完美过渡。
ts
const [arr, setArr] = useState([1, 2, 3, 4, 5, 6])

function getClass(node: string) {
  let position = ''
  if (node === arr[0]) {
    position = 'll'
  }
  if (node === arr[1]) {
    position = 'l'
  }
  if (node === arr[2]) {
    position = 'c'
  }
  if (node === arr[3]) {
    position = 'r'
  }
  if (node === arr[4]) {
    position = 'rr'
  }
  return 'card ' + position
}

function prev() {
  const temp = [...arr]
  temp.unshift(temp.pop())
  setArr(temp)
}

function next() {
  const temp = [...arr]
  temp.push(temp.shift())
  setArr(temp)
}看到这简短的将头塞到尾的骚操作,我不禁感叹,早知道,还是数组